At a Glance: - Time: 20–45 minutes (depending on coil location) - Cost: $10–$30 for tools (coil brush + vacuum attachment) - Skill Level: Beginner - Tools: Long-reach coil brush, vacuum with crevice and soft-brush attachments, microfiber cloth, dust mask
How to clean refrigerator coils safely and lower energy bills
Cleaning your refrigerator's condenser coils — the heat-releasing coils that help the appliance shed warmth — can improve cooling efficiency and reduce the energy the compressor draws every hour. That efficiency gain is real, but it comes with one important condition: your refrigerator must have exposed, accessible condenser coils at the rear or behind the base-front grille. Newer models with sealed, low-profile, or manufacturer-designated "maintenance-free" condensers may not need or allow DIY cleaning at all.
ENERGY STAR recommends cleaning refrigerator coils twice a year for existing refrigerators. If you have pets or a dusty home, that interval shortens considerably. The reason is straightforward: dust and pet hair act like insulation around the coils, trapping heat the coils are supposed to release. The compressor then runs longer cycles to hit the set temperature, drawing more electricity every month it stays dirty.
Before you move anything or snap off a panel, the single most important step is identifying which coil design your refrigerator has. The cleaning procedure for rear-mounted coils is completely different from the procedure for base-front coils behind the kickplate — and some models require a licensed tech to handle it at all. Per Whirlpool's product support: "For some models, an authorized service provider will need to be contacted to perform the cleaning." If you're not sure which category your fridge falls into, start with the location guide below before doing anything else. If you'd prefer a professional to handle it from the start, a local home appliance maintenance service is a sensible call.
Where refrigerator coils are located: rear coils vs base grille
Refrigerator condenser coils sit in one of two places, and which one determines everything about how you clean them — or whether you clean them yourself at all.
Path 1 — Rear-mounted coils: On older refrigerators (mostly pre-2000s, but some budget models still use this design), the condenser coils are a visible grid of black tubing mounted directly on the back of the unit. They're exposed to room air without any cover. You can see them the moment you pull the fridge away from the wall.
Path 2 — Base-front coils behind the kickplate: Most refrigerators sold in the US in the last two decades tuck the condenser behind a snap-on grille or kickplate at the bottom front of the unit. The coils, condenser fan, and compressor all live in a compartment you access by removing that grille — no moving the fridge required.
Path 3 — Maintenance-free or sealed condensers: Many French door, counter-depth, and premium refrigerators made after roughly 2010 use a low-profile condenser that the manufacturer says doesn't require periodic cleaning. Whirlpool's product support documentation notes that on these models, "if the condenser does need to be cleaned, please refer to the Owner's Manual for instructions" — meaning the default assumption is that cleaning isn't a routine homeowner task.
Simple decision rule: Pull the fridge about six inches from the wall. Look at the back. If you see a grid of black metal tubing or wires, you have rear-mounted coils. If the back is a flat metal panel with no visible grid, look at the front bottom of the unit for a grille strip. If there's a plastic grille running the full width of the base, you almost certainly have base-front coils. If neither applies — or if the manual says "no periodic condenser cleaning required" — skip the DIY steps and verify with the owner's manual before proceeding.
[Image: Side-by-side diagram — rear-mounted coil grid vs. base-front kickplate grille location]
How to identify a rear-mounted condenser coil
Stand behind your refrigerator and look at the back panel. A rear-mounted condenser has a recognizable look: black or dark gray tubular coils arranged in a serpentine pattern, often with thin wire supports, covering most of the back surface. The coils are fully exposed — no cover panel, no grille, nothing between them and the air in the room.
Visual cue checklist for rear coils: - Visible black tubing in a grid or serpentine layout on the back panel - Fins or wires running perpendicular to the tubes - Dust bunnies visibly collecting on the tubing without needing to remove anything - No grille or kickplate at the base front
If you see a back panel that is solid metal with no visible coils and a few ventilation slots or gaps, do not remove that panel without consulting your owner's manual. Some models have an internal condenser that is not user-serviceable. Per Whirlpool's product support, certain models require an authorized service provider even for condenser cleaning — removing a sealed back panel without guidance can void your warranty or cause refrigerant line damage.
How to identify a bottom-mounted condenser coil behind the kickplate
Look at the front base of your refrigerator, between the floor and the bottom of the door. If there's a strip of plastic — usually black or stainless-colored, running the full width of the unit — that's the kickplate or base grille. Behind it is typically the condenser coil compartment.
KitchenAid's product help specifically directs users to "clean base grille with vacuum or Refrigerator Coil Brush (part: 4210463RW)" — confirming this is a standard user-accessible location on a wide range of models. GE's older printed instructions describe the snap-in design: to replace the base grille, you align the prongs on the back of the grille with clamps in the cabinet and push forward until it snaps into place.
Renter caution: If the base grille doesn't move when you apply gentle, even pressure with your fingers at both ends, don't force it. Some panels use a screw-retained design rather than a snap-fit. Check your manual first. Breaking a plastic kickplate in a rental unit is an avoidable repair bill.
Tools and safety gear for cleaning refrigerator coils
Gather everything before you move the refrigerator or pop the grille. The job requires two primary tools and a couple of protective items.
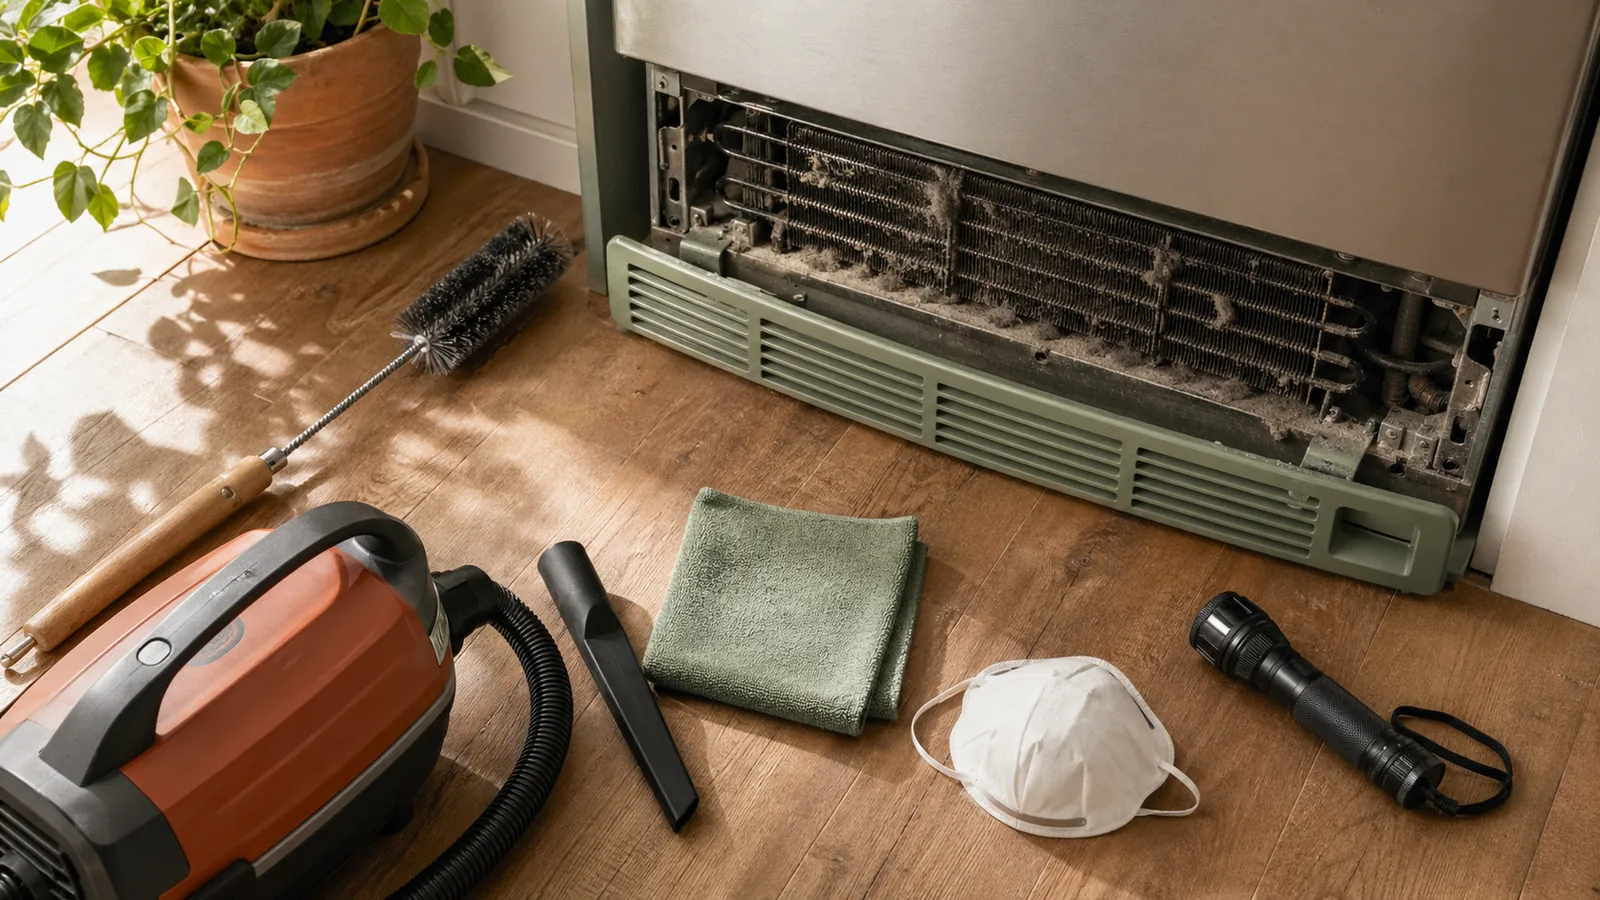
Full tool list: - Long-reach condenser coil brush — approximately 27 inches long, with soft nylon or polyester bristles. This is the most important tool for getting between coil fins without bending them. - Vacuum cleaner with crevice and soft-brush attachments — per Maytag's product help: "Use a vacuum cleaner with a soft brush to clean the grille, the open areas behind the grille, and the front surface area of the condenser." - Microfiber cloth — for wiping the grille panel and the floor area around the compressor - Dust mask (N95 or basic disposable) — the dust and pet hair that accumulates around condenser coils is compressed and dense. When you disturb it, it goes airborne fast. If you have allergies or asthma, a mask is non-negotiable. - Flashlight or headlamp — the base-front compartment is dark; you need to see what you're cleaning - Appliance sliders or cardboard sheet — for protecting flooring if you need to move the fridge for rear-coil access
Product picks: If you want a simple grab-and-go setup, pair the Frigidaire Refrigerator Coil Brush with a vacuum cleaner with a soft brush attachment so you can brush, lift, and vacuum in one pass without bending fins. The Frigidaire brush is built for tight coil spaces, and a vacuum with a detachable hose and soft-brush head makes the cleanup faster when pet hair is packed around the compressor area. For most households, that combination stays in the same $10–$30 tool range noted above.
Avoid wire brushes, stiff metal tools, compressed air cans pointed at close range, and any wet cleaning method near the coils. None of these belong in this job.
Best coil brush length and vacuum attachments to use
A standard coil brush runs about 27 inches, which is long enough to reach from the front grille opening to the back of the base compartment on most full-size refrigerators. Shorter brushes (under 18 inches) leave the rear portion of the compartment untouched — which is exactly where the worst buildup tends to accumulate.
Tool recommendations:
The Frigidaire Refrigerator Coil Brush, available at Lowe's, is a reliable, widely stocked option with soft bristles designed specifically to avoid bending delicate fins. KitchenAid officially names the Refrigerator Coil Brush part 4210463RW as the approved cleaning tool for its base-grille condenser models — that part is compatible with KitchenAid, Whirlpool, and Maytag models sharing the same platform. Both brushes run roughly $10–$15.
For the vacuum, a standard canister vacuum or any upright with a detachable hose works. You need two attachments: a crevice tool (the narrow, flat nozzle) for reaching the floor of the compartment and edges of the coil frame, and a soft-brush attachment for the front face of the coil and the grille itself. Dyson, Shark, and Bissell canisters all include both attachments in their standard kits. If your vacuum only came with a crevice tool, the brush is more important — buy one as an add-on for about $5–$10.
Pro Tip: If you have a shed dog or a long-haired cat, do the coil compartment floor check before you buy a brush. You might find a full-blown "dust bunny colony" that a brush alone won't handle — in that case, start with the crevice tool vacuum pass first, then finish with the brush.
Affiliate picks: The refrigerator condenser brush affiliate and vacuum cleaner affiliate pair well here because the brush loosens compacted lint while the vacuum pulls it out before it gets back into the compressor area. If you're buying only one item, choose the brush first; if you're replacing an older machine, a vacuum with a soft brush head is the better long-term buy.
Safety steps before you touch the coils
Unplug the refrigerator before you do anything else. This is not optional, regardless of whether you're accessing rear coils or base-front coils. Maytag's product help states it plainly: "If the condenser does need to be cleaned: Unplug the refrigerator." Whirlpool's documentation uses the same first step across all condenser-cleaning procedures.
Power disconnection protocol: 1. Pull the refrigerator's plug from the wall outlet completely — don't just push the fridge and assume the cord goes taut and pulls out; verify it's unplugged. 2. If the fridge is hardwired or has a water line connection, turn off the water supply valve before moving the unit. 3. Wait two minutes after unplugging before touching the condenser area — capacitors in the compressor circuit can hold a small charge briefly.
Watch Out: Never spray water, cleaning solution, or coil-cleaning foam directly onto condenser coils unless the product is specifically rated for refrigerator condensers and the unit is fully unplugged and dried before reconnecting. Electrical contact with wet coils is a fire and shock hazard. This job is dry-cleaning only.
How to clean rear refrigerator coils step by step
Rear coils are exposed and easy to see, but accessing them requires moving a full-size appliance — which is the part that causes most of the frustration. Work methodically and you'll be done in under 30 minutes.
Step 1: Unplug the refrigerator and create working space
- Before the fridge moves an inch, confirm the power cord is out of the wall. Then prepare the floor.
- Safety-first checklist:
- [ ] Refrigerator unplugged and cord clear of the path
- [ ] Water supply line shut off (if the fridge has an ice maker or water dispenser)
- [ ] Cardboard sheet, appliance sliders, or moving blanket placed under the front feet to protect hardwood or tile
- [ ] A clear path of at least 24 inches behind the unit for you to work
- Pull the refrigerator straight back from the wall — avoid side-angling it, which stresses water line connections. Two feet of clearance is enough to work; you don't need to drag it to the middle of the kitchen.
-
Pro Tip: If you're working alone, appliance sliders (plastic discs that sit under each foot) make a 200-plus-pound fridge glide on hardwood or tile without scoring the floor. They're $10–$15 at Home Depot and worth keeping for future moves.
Step 2: Brush dust and pet hair from the rear coils
- With the fridge pulled out and unplugged, put on your dust mask. Rear coils are typically a serpentine grid of thin-walled tubing with supporting wire fins. The goal is to dislodge dust without bending the fins or kinking the tubing.
- Insert the coil brush between the coil loops and use short, controlled strokes — about three to four inches of travel, working from top to bottom. Don't push the brush hard against the tubes; the bristles do the work. If a section of coil is especially matted with pet hair, use a gentle pulling motion outward rather than scrubbing side to side.
- Work your way across the full width of the coil grid. Pay extra attention to the lower section near the compressor, where heat is highest and buildup tends to be densest. Avoid bending any fins — bent fins reduce airflow and partially offset the benefit of cleaning. If a fin is already bent, a fin comb (sold at appliance parts stores for around $8) can straighten it.
Step 3: Vacuum the loosened debris and clean the floor area
- Once you've brushed the full coil surface, switch to the vacuum. Attach the soft-brush nozzle and run it across the front face of the coil grid to capture loosened debris. Per Maytag's product help: "Use a vacuum cleaner with a soft brush to clean the grille, the open areas behind the grille, and the front surface area of the condenser."
- Switch to the crevice tool for the floor behind and under the fridge — this is where loosened pet hair and dust fall and collect. Don't skip it; debris on the floor gets recirculated into the compressor area the moment the fridge goes back against the wall.
- After vacuuming, do a quick airflow check: per ENERGY STAR's refrigerator guidance, leave a few inches of clearance between the wall and the back of the refrigerator to allow the condenser to exhaust heat properly. Pushing the fridge flush against the wall after cleaning partially defeats the purpose of cleaning it.
- Push the fridge back into position (with the clearance gap), reconnect any water line, and plug it back in.
How to clean bottom-front refrigerator coils behind the grille
Base-front coils are the more common design on refrigerators sold in the US since 2000, and they're actually easier to clean than rear coils because you don't have to move the fridge. The procedure is compact: remove the grille, brush and vacuum the compartment, replace the grille, plug back in.
How to remove a snap-on base grille without breaking it
The base grille (also called the kickplate or appliance kickplate) on most GE, Whirlpool, KitchenAid, Maytag, LG, and Samsung refrigerators snaps on and off without tools. GE's instructions describe the mechanism: the back of the grille has small plastic prongs that align with spring clamps in the cabinet frame. To remove it, grip both ends of the grille simultaneously and pull straight out toward you with even pressure. It should release with a soft pop.
If it resists: - Check for a single Phillips screw at the center — some models add one screw to prevent accidental removal - Check the owner's manual for your specific model; grille retention designs vary - Do not use a flathead screwdriver to pry the panel; the plastic clips break easily and replacements are model-specific
When reinstalling, align the prongs with the clamps and push straight in until you feel the clips engage on both sides. A grille that's only half-snapped will rattle every time the compressor cycles.
Watch Out: If the grille feels unusually rigid or won't budge after you've checked for screws, stop and pull up the owner's manual before applying more force. Some high-end models (certain Sub-Zero and Thermador units) have a front grille that's part of the cabinet panel and requires a technician to service the compartment behind it.
How to clean around the condenser fan and compressor area
With the grille off, shine your flashlight into the base compartment. You'll typically see the condenser coil (a smaller, denser version of the rear-grid style), a condenser fan motor with a blade, and the compressor (a round or cylindrical black component). All three collect dust and pet hair.
Cleaning sequence: 1. Put on your dust mask — this compartment is often the dirtiest spot in the kitchen. 2. Insert the coil brush horizontally into the compartment and work it across the face of the condenser coil in short strokes, sweeping debris toward the front opening. 3. Use the vacuum crevice tool to pull debris out of the opening and to clean the floor pan under the compressor — this drip pan area collects both dust and occasional moisture. 4. Use the soft-brush vacuum attachment on the condenser fan blades if they're visible and accessible; a dust-caked fan moves less air than a clean one. 5. Wipe the inside face of the grille itself with a microfiber cloth before snapping it back on.
Avoid disturbing any wiring harnesses or refrigerant lines running through the compartment. You don't need to touch them, and the cleaning tools shouldn't need to reach them. The goal is surface dust on the coils, fan, and floor — nothing more invasive than that.
How often to clean refrigerator coils and when pets make it necessary sooner
ENERGY STAR recommends cleaning refrigerator coils twice a year for existing refrigerators — roughly every six months. That's the baseline for a household without pets in a normally dusty environment.
KitchenAid's product help pushes that considerably more frequent for high-efficiency performance: "repeat every 2-3 months for optimal efficiency." That interval makes sense for households with shedding pets, because pet hair compresses into dense mats in the coil compartment far faster than ordinary household dust does.
Practical maintenance schedule:
| Household Type | Recommended Cleaning Frequency |
|---|---|
| No pets, low dust | Every 6 months |
| One or two indoor pets | Every 3–4 months |
| Multiple pets or heavy shedders | Every 2–3 months |
The twice-yearly ENERGY STAR baseline is a reasonable minimum, but if you notice lint building up quickly or the grille is visibly collecting fuzz, check the coil compartment every 60 days. You'll know immediately whether the interval needs to shorten.
Signs your coils need cleaning now
Several signals indicate your condenser is working harder than it should — often because coils are overdue for cleaning.
- The exterior cabinet sides feel warm or hot to the touch. A properly functioning refrigerator exhausts some heat, but unusually warm sides suggest the compressor is running extended cycles.
- The compressor runs almost continuously or you notice louder, more frequent cycling sounds from the base or rear of the unit.
- Visible lint or "dust bunny" buildup at the base grille. If debris is spilling out from behind the grille, the compartment behind it is almost certainly overloaded.
- The interior temperature is slightly higher than your set point even though the fridge is running constantly. This is the most direct sign that heat dissipation is compromised.
- Higher-than-normal electricity bills with no other obvious cause — though this one requires process of elimination.
ENERGY STAR's refrigerator guidance specifically flags coil cleaning as a maintenance task for older models, noting that a neglected condenser directly undermines the appliance's energy performance.
When cleaning refrigerator coils will not help
Not every refrigerator has condenser coils that a homeowner can or should clean. This is the fact most online guides skip — and it's why some readers clean nothing, find nothing, and assume the article was wrong.
Maintenance-free condenser designs: Many refrigerators built after 2010 — especially French door, side-by-side, and counter-depth models from Whirlpool, LG, Samsung, and Bosch — use a low-profile condenser that the manufacturer explicitly designates as not requiring periodic cleaning. Whirlpool's product support is direct: "If the condenser does need to be cleaned, please refer to the Owner's Manual for instructions" — with the implication being that many models do not require it under normal circumstances.
Decision tree:
- Does your model have a base-front grille? → Check the owner's manual for a "condenser cleaning" section.
- Does the manual include a condenser cleaning procedure? → Follow it. This article's steps apply.
- Does the manual say "no periodic condenser cleaning required" or "maintenance-free condenser"? → Stop the DIY cleaning steps here; they do not apply to your refrigerator. Do not force access.
- Is there no visible rear-coil grid and no base-front grille? → The condenser is internal and sealed. Per ENERGY STAR, read the user's manual to learn how to safely clean coils — if the manual is silent, the condenser is not user-serviceable.
The cleaning steps in this article apply to refrigerators with exposed rear coils or accessible base-front grille condensers. If your model falls outside those designs, cleaning the coils isn't a DIY task.
How to confirm your refrigerator manual and model design
Find the model number label — it's almost always on the interior wall of the refrigerator compartment (left side wall or ceiling), on the door jamb, or on the back of the unit.
With the model number in hand:
1. Search [model number] + owner's manual on the manufacturer's website. GE Appliances, Whirlpool, KitchenAid, Maytag, LG, and Samsung all host downloadable PDFs.
2. Search the PDF for "condenser" or "coil cleaning."
3. Per ENERGY STAR's guidance: "Read the user's manual to learn how to safely clean coils." That's the definitive instruction — not a generic online guide, not this article.
If the manual describes a cleaning procedure, follow it. If it says no cleaning is required, trust that. If it says to contact an authorized service provider, that's the answer for your model.
Common mistakes that can damage refrigerator coils
Most coil-cleaning damage is avoidable. The five mistakes below account for the majority of DIY problems.
- Bending the condenser fins. Coil fins are thin aluminum strips that direct airflow across the refrigerant tubes. Forcing a stiff brush or a vacuum nozzle sideways against them bends them flat, reducing airflow. Use only a dedicated coil brush with soft bristles and keep strokes controlled.
- Using metal tools to scrape debris. A screwdriver, putty knife, or wire brush can nick refrigerant lines or crack solder joints. Stick to the coil brush and vacuum.
- Spraying water or liquid cleaners directly on the coils. This risks electrical shorts in the compressor wiring and corrosion on the coil fins. Coil cleaning is always a dry process unless you're using a product explicitly rated for refrigeration condenser coils and have confirmed the unit is fully de-energized.
- Forgetting to restore the required airflow clearance. After cleaning rear coils, pushing the fridge back flat against the wall eliminates the heat-exhaust gap. ENERGY STAR recommends leaving a few inches between the wall and the refrigerator. A gap of a few inches is the general minimum for most models.
- Not securing the base grille on reassembly. A half-snapped kickplate rattles, lets debris into the coil compartment faster, and can be kicked loose. Press both ends firmly until both clips engage before calling the job done.
When to call an appliance repair service
Most refrigerator coil cleaning is genuinely a DIY job — 20 to 45 minutes, two tools, no special knowledge required. But several situations call for a professional instead.
When to Call a Pro: - Your owner's manual says the condenser requires an authorized service provider for cleaning (as noted in Whirlpool's product support) - You smell burning or a sharp electrical odor near the base compartment or compressor area - The base grille is cracked, broken, or won't snap back into place after normal removal - The refrigerator still isn't cooling properly after a thorough coil cleaning — the issue may be a failing compressor, low refrigerant, or a faulty condenser fan motor, none of which are DIY repairs - You find physical damage to the coils — bent, kinked, or visibly corroded refrigerant tubing requires professional assessment - The fridge is under manufacturer warranty and the manual warns that DIY condenser service voids it
A qualified appliance repair technician can diagnose and clean a sealed or manufacturer-restricted condenser without voiding your warranty. If your refrigerator is more than 10–12 years old and showing signs of compressor stress even after you've cleaned the coils, ask the tech for an honest assessment of remaining service life before investing in a major repair. A home appliance maintenance service visit typically runs $75–$150 for diagnostics, and many companies offer annual maintenance plans that include condenser cleaning as part of a broader checkup.
Refrigerator coil cleaning FAQ
Can cleaning refrigerator coils really lower energy bills?
Yes — for refrigerators with accessible rear or base-front condensers, cleaning the coils can improve cooling performance and reduce the energy the compressor draws. The mechanism is direct: dirty coils trap heat around the refrigerant tubing, forcing the compressor to run longer to reach the set temperature. A compressor running longer draws more electricity. ENERGY STAR recommends cleaning coils twice a year specifically because of this energy-performance link.
The caveat is important: this only applies to models with serviceable condensers. On refrigerators with sealed, low-profile, or maintenance-free condenser designs, the coils aren't accessible for cleaning, and the efficiency claim doesn't apply. Per Whirlpool's product support, cleaning requirements are model-dependent — confirm your design before expecting the savings.
Can you clean fridge coils without moving the refrigerator?
It depends entirely on where the coils are. If your refrigerator has base-front coils behind the kickplate, yes — snap off the grille, brush and vacuum the compartment from the front, and you never touch the fridge's position.
If your refrigerator has rear-mounted coils (common on older or budget models), no — you'll need to pull the unit away from the wall by at least 24 inches to access the coil grid. Use appliance sliders to protect your floor.
Is it safe to vacuum refrigerator coils?
Yes, with the right attachment and with the fridge unplugged. Maytag's product help specifically calls for "a vacuum cleaner with a soft brush to clean the grille, the open areas behind the grille, and the front surface area of the condenser." The soft-brush attachment matters: a bare crevice nozzle pressed directly against coil fins can bend them.
Best practice is to brush first (loosening compacted debris) and vacuum second (capturing the loosened material). Using the vacuum alone without brushing first often just pushes dense pet-hair mats deeper into the coil compartment rather than removing them.
What is the best tool for cleaning refrigerator coils?
The correct pairing is a dedicated refrigerator coil brush plus a vacuum with a soft-brush attachment. For the brush, the Frigidaire Refrigerator Coil Brush (available at Lowe's) and the KitchenAid Refrigerator Coil Brush, part 4210463RW are both widely available, purpose-built options with soft bristles sized for standard US condenser compartments. Both are in the $10–$15 range.
For the vacuum, Maytag's product help specifies a soft-brush attachment for the condenser face, and a crevice tool handles the floor of the compartment and tight edges. Any canister vacuum from Dyson, Shark, or Bissell with a detachable hose covers both needs with standard included accessories. If you're buying specifically for this task, a 27-inch coil brush ($10–$15) is the only purchase you strictly need — most households already own a vacuum with a crevice tool.
Affiliate picks: The refrigerator condenser brush affiliate and vacuum cleaner affiliate pair well here because the brush loosens compacted lint while the vacuum pulls it out before it gets back into the compressor area. If you're buying only one item, choose the brush first; if you're replacing an older machine, a vacuum with a soft brush head is the better long-term buy.
Sources & References
- BobVila.com — How to Clean Refrigerator Coils — primary authority source for maintenance overview and brush sizing
- ENERGY STAR — Save Energy Checklists — twice-yearly coil cleaning recommendation for existing refrigerators
- ENERGY STAR — Refrigerators Product Guidance — airflow clearance and coil maintenance for older models
- KitchenAid Product Help — How and When to Safely Clean the Condenser Coils — base-grille cleaning procedure and coil brush part number 4210463RW
- Maytag Product Help — Cleaning the Condenser (Top Freezer Refrigerator) — unplugging protocol and soft-brush vacuum recommendation
- Whirlpool Product Help — Cleaning the Refrigerator Condenser (French Door) — model-dependent cleaning requirements and authorized service provider note
- Whirlpool Product Help — Cleaning the Condenser (All Refrigerator) — base grille and rear coil access variations
- GE Appliances Older PDF Instructions (49-6953) — snap-on base grille prong-and-clamp design description
- Lowe's — Frigidaire Refrigerator Coil Brush Product Page — US retail availability of dedicated coil brush
Keywords: condenser coils, evaporator coils, base grille, rear-mounted coils, coil brush, vacuum with crevice attachment, ENERGY STAR, unplug the refrigerator, compressor, pet hair buildup, dust mask, appliance kickplate, maintenance-free condenser, coil cleaning frequency