How to install a video doorbell without existing wiring at a glance
Yes — you can absolutely install a battery-powered video doorbell without any existing wiring, and most homeowners finish the job in about 30–60 minutes with a drill and a smartphone. If your surface is complex or your wall condition is uncertain, stop and bring in a pro rather than forcing the install.
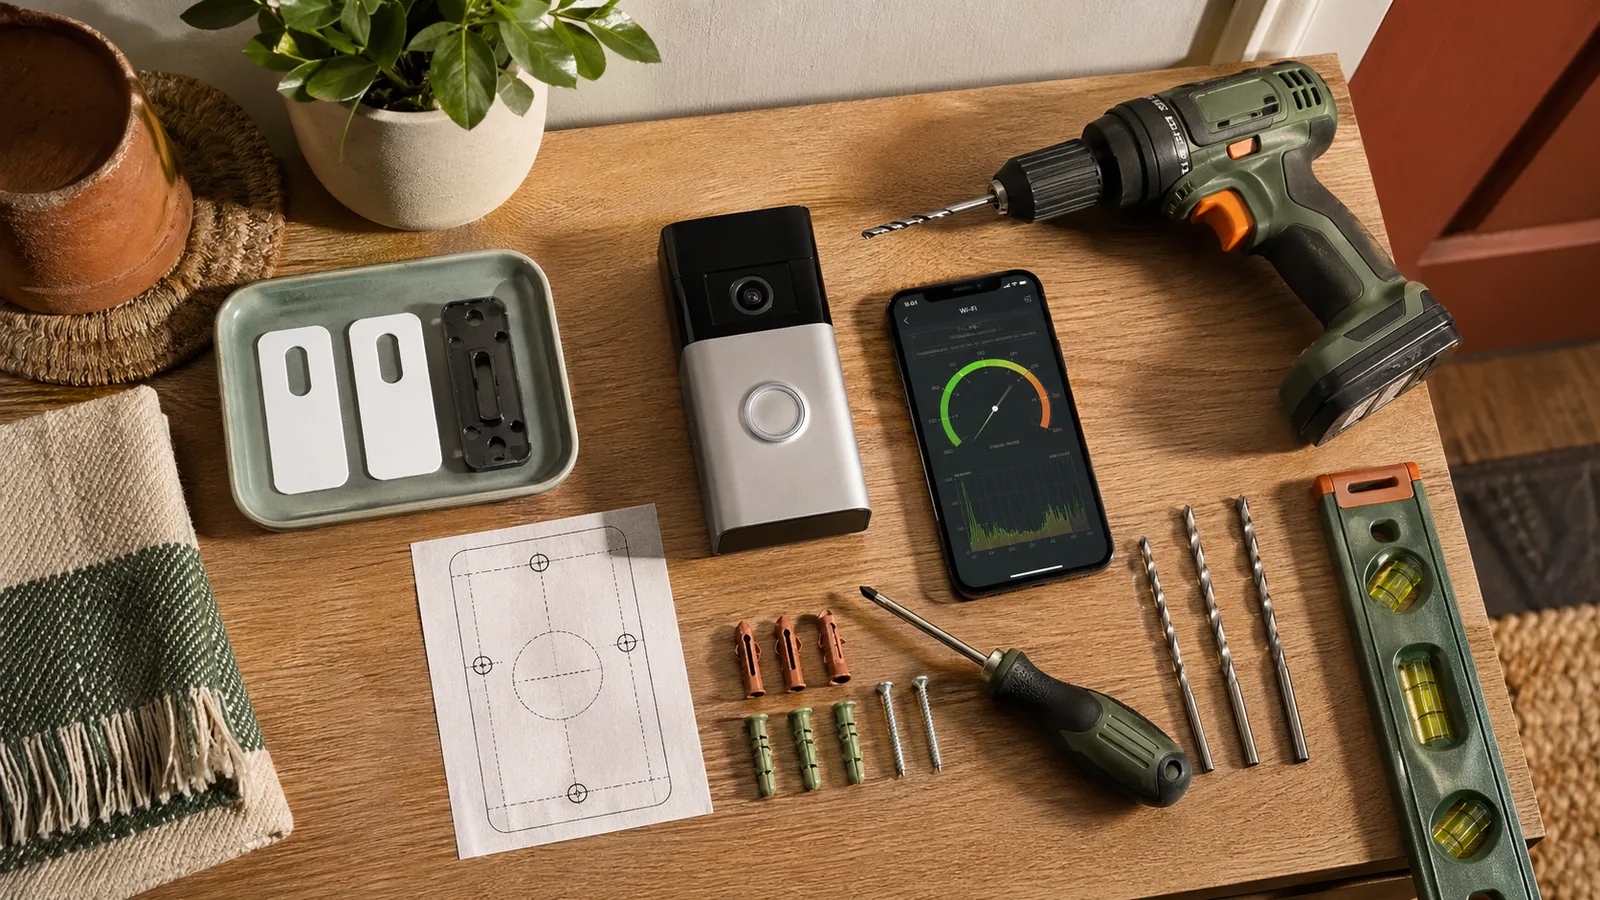
At a Glance: - Time: 30–60 minutes - DIY cost: $80–$250 for the doorbell + $0–$20 in mounting hardware - Professional install cost: $143–$398 per Angi's 2025 data — the DIY route saves you real money - Skill level: Beginner — if you can hang a picture frame, you can do this - Tools needed: Power drill, masonry bits (for brick or stucco), level, Wi-Fi analyzer app, screwdriver - The thing most guides skip: You must verify your Wi-Fi signal strength at the exact mounting spot before you drill. This article includes a Signal Strength Checklist to do exactly that.
As eufy's installation guide puts it, "a battery-operated doorbell camera is an excellent option" for homes without existing doorbell wiring — and that includes apartments, newer construction, and any entryway where running new low-voltage wire isn't practical or permitted. For shoppers comparing options on a smart home affiliate or video doorbell affiliate page, this is the cleanest path into smart home security without redoing the entryway.
The three brands most buyers compare in 2026 — Ring, eufy Security, and Google Nest — all make fully wireless battery models with no wiring requirement. This guide covers all three, plus the one critical pre-drill step (Wi-Fi signal testing) that separates a doorbell that works flawlessly from one that misses motion events and dies every two weeks.
Tools and materials for a battery-powered video doorbell install
Gather everything before you touch the wall. Mid-project hardware-store runs are how 30-minute jobs become two-hour headaches.
Tools you'll need: - Power drill (cordless is fine) - Masonry drill bits for brick or stucco - Standard drill bits for wood or vinyl siding - Level (a 4-inch torpedo level works great here) - Pencil or painter's tape for marking - Screwdriver (most bracket screws are Phillips #2) - Wi-Fi analyzer app on your phone - Tape measure - Leveling template that ships with most doorbells - Screws that come with the mounting bracket - Wall anchors matched to your wall surface
Materials you'll likely need: - Wall anchors appropriate for your surface (plastic expansion anchors for drywall or wood; masonry anchors for brick or stucco) - The leveling/drilling template that ships with most doorbells — use it, don't eyeball it - A wedge kit if your wall is angled relative to foot traffic (sold separately for Ring; included with Nest) - A UL Listed doorbell or charger kit when you are buying the unit itself, since the label is a useful safety and compliance check on the packaging
The Ring Battery Doorbell uses 802.11 b/g/n Wi-Fi at 2.4 GHz and requires a minimum upload speed of 2 Mbps, so your router's position relative to the front door matters as much as the physical install.
What comes in the box versus what you need to buy
Every brand packages things a little differently, and knowing this before checkout saves a separate Amazon order.
| Item | Ring Battery Doorbell | Google Nest Doorbell (Battery) | eufy Battery Doorbell |
|---|---|---|---|
| Mounting bracket + screws | ✅ Included | ✅ Included (wall plate) | ✅ Included |
| Leveling/drill template | ✅ Included | ✅ Included | ✅ Included |
| Wedge/corner kit | Sold separately | ✅ Included | Varies by model |
| Charging cable | Micro USB included | USB-C to USB-A included | Micro USB included |
| Masonry anchors | ✅ Included | ✅ Included | ✅ Included |
| Indoor chime unit | ❌ Not included | ❌ Not included | ❌ Not included |
A few things worth noting: Ring's installation support page references a Wedge Kit and Corner Kit as accessories — these are not bundled in the basic box, so if your door frame sits at an angle to your walkway, budget an extra $10–$15 for that kit. The Google Nest Doorbell (battery), on the other hand, already includes a wedge for corner mounting, which is a genuine advantage for corner entryways.
Neither Ring nor Nest includes an indoor plug-in chime unit. If you want an audible alert inside your home beyond your phone notification, that's a separate purchase — Ring sells its Chime ($29.99) and Chime Pro separately, and Google works through its Home speaker ecosystem.
Pro Tip: If your current door frame is wood and you're not on brick or stucco, the included plastic anchors will likely work fine. Save the masonry anchors that come in the box for when you actually need them — and replace them with contractor-grade anchors if you do have masonry walls.
Check Wi-Fi signal strength at the door before you drill
This is the step that most installation guides skip entirely, and it's the single biggest reason newly installed video doorbells underperform. Before you put a single hole in your wall, stand at your intended mounting spot and confirm the router signal is strong enough for the model you picked.
Signal Strength Checklist — complete this before drilling:
- Stand at the mounting location with your phone — ideally at about 48 inches off the ground (your future doorbell height).
- Open your Wi-Fi settings and confirm your phone is connected to the same network your doorbell will use.
- Confirm the correct band is present. Ring Battery Doorbell requires 2.4 GHz — confirm your router is broadcasting 2.4 GHz and that your phone can see it from the doorstep. If you have a mesh system that broadcasts a single SSID, verify the 2.4 GHz radio is active.
- Run a speed test from that location using Speedtest.net or Fast.com. Ring requires a minimum upload speed of 2 Mbps for optimal performance. If you're seeing less than that at the door, address your router placement or consider a Wi-Fi extender before installing.
- Check for interference — metal doors, concrete walls, and thick brick can attenuate signal dramatically between the router and the mounting point.
- If signal is borderline, try moving the doorbell location 6–12 inches toward the door frame (closer to the house interior) before committing to holes.
The Google Nest Doorbell (battery) supports both 2.4 GHz and 5 GHz (802.11a/b/g/n/ac), which gives it more flexibility on modern mesh networks — but you still need to confirm adequate signal at the front door, regardless of which band you're using.
How to use a Wi-Fi analyzer app at the front door
Check the signal with your phone's built-in network view or a basic speed test at the door, then compare the reading with the manufacturer's Wi-Fi requirements. RSSI (Received Signal Strength Indicator) measures signal strength in negative decibels: the number closer to zero is better. A reading around -40 dBm is strong, while numbers closer to -80 dBm are generally weak for streaming video.
Open the tool, let it settle for 30 seconds at your mount location, and note the reading. Move 12 inches in each direction to find the sweet spot if the first number looks marginal. This takes three minutes and saves hours of troubleshooting later.
Pro Tip: Mesh Wi-Fi systems like Eero, Google Nest WiFi Pro, or Orbi are the most reliable solution for front-door coverage. A single satellite node placed inside near the front entryway can transform a weak reading into a usable one.
Why weak Wi-Fi causes latency, dropped clips, and battery drain
A video doorbell on weak Wi-Fi has to work harder to maintain its connection. When the signal drops below what's needed to stream reliably, the doorbell's radio keeps re-transmitting packets, which is why the device may feel sluggish or miss clips.
The practical results you'll notice: motion alerts that arrive late, video clips that start mid-event or don't save at all, and a battery that feels like it needs attention more often than it should. Fixing the Wi-Fi is almost always cheaper and faster than returning the doorbell.
Choose the right mounting height and location for face and package capture
Mount your video doorbell at 48 inches from the ground. That's the height eufy's installation guide cites as optimal, and it's a well-established benchmark across manufacturers: at 4 feet high, a standard wide-angle doorbell camera captures faces of adults at a usable angle while still showing packages left on the porch below.
If you mount too high (say, 6 feet, which is where many people instinctively place a doorbell at eye level), the camera angle is too steep downward to identify faces clearly. Too low and you lose package visibility and risk the lens getting obscured by porch railings or planters.
Placement rules beyond height: - Position the camera so it covers the full width of your walkway or porch approach — not just the door itself - Avoid pointing directly at a street light or the afternoon sun; lens glare kills video quality - Keep the camera within the physical reach of your Wi-Fi signal (confirmed in your pre-drill checklist) - For renters: confirm with your lease whether you're permitted to drill; some no-drill adhesive mounts exist, though most manufacturers don't formally recommend them for security-critical devices - Look for a UL Listed mounting kit or power accessory when the package offers one, since that label helps you screen for gear built to recognized safety standards
Best height for a doorbell camera on brick, stucco, and siding
The 48-inch mounting height applies regardless of surface, but how you get there depends on your wall material.
Wood or vinyl siding: Straightforward. Use the included screws and follow the template so the bracket sits squarely.
Brick veneer: Use the surface-appropriate anchors supplied in the box and follow the manufacturer's guidance for masonry surfaces. eufy's installation guide explicitly calls out masonry anchors as the requirement for brick surfaces.
Stucco: Stucco looks manageable but can crack badly if drilled without care. Use the mount hardware recommended for stucco by the manufacturer and avoid the edges of the stucco panel.
Pre-stressed concrete: Stop — read the "When to Call a Pro" section below before attempting this.
Watch Out: Never skip the appropriate anchor for your surface. A battery doorbell mounted with drywall anchors into a stucco wall will pull loose within a few weeks, especially in freeze-thaw climates where thermal expansion stresses the mount daily.
How to mount the doorbell with the leveling template and anchors
Every battery doorbell ships with a paper or cardboard drilling template — use it. It's pre-punched with the exact hole spacing your bracket needs, and it takes the guesswork out of getting those holes level and aligned.
Mounting sequence — numbered steps:
- Charge the doorbell fully before mounting. Most batteries come partially charged, but starting at 100% gives you a reliable baseline for battery-life testing post-install.
- Tape the leveling template to the wall at 48 inches from the ground (measure to the center of the template).
- Use your torpedo level across the top edge of the template. Adjust until the bubble is centered, then press the tape firmly.
- Mark the hole locations through the template with a pencil. Make the marks dark and clear — they're your drilling targets.
- Remove the template and double-check your marks are level using the torpedo level again. This two-step check catches template-tape sag.
- Drill pilot holes at your marked locations using the hardware and anchor guidance that came with your specific doorbell.
- Set your wall anchors flush with the surface.
- Align the bracket over the anchors and drive the provided screws. Snug but not overtightened — you don't want to crack masonry or stucco.
- Snap the doorbell onto the bracket and confirm it's seated fully (you should hear or feel a click on most models).
- Test the camera angle via the app before installing the security screw.
Pro Tip: Take a photo of your marked holes before drilling. If a bit wanders, you have a reference for exactly where you intended to land.
Mark the screw holes and confirm the view on the app
Before you drill, do one extra check that most guides skip: open your doorbell's app, put the unit in setup mode, and hold it against the template position by hand. Most Ring, eufy, and Nest apps let you preview the camera view during setup.
[Image: Screenshot of Ring app live view showing camera angle preview before mounting]
Look at what the camera actually sees from 48 inches at your specific door. If a porch pillar blocks half the walkway, or the camera points too far left, adjust your template position now — moving tape is free, filling unwanted holes is not.
Drill pilot holes and set the correct masonry anchors
For standard wood or drywall surfaces, use the screws and anchors supplied with the doorbell kit.
For brick or stucco, switch to the masonry anchors recommended by the manufacturer and make the hole size match the anchor hardware that came with the box. Drill at low speed with firm, steady pressure — don't force it. Pull the bit out every few seconds to clear dust, which helps prevent the bit from binding.
Once holes are drilled, set your anchors flush using the method recommended for the wall surface. They should sit level with the wall surface. If they go in crooked, the bracket won't sit flat and the doorbell will never be truly level.
Watch Out: If your drill bit hits a void or the stucco surface crumbles around the hole, stop immediately. This signals poor stucco adhesion underneath — a condition that requires professional patching before any anchor will hold reliably.
Attach the bracket, snap on the doorbell, and test the angle
With anchors set, drive the mounting screws through the bracket until firm. Don't overtighten — strip the anchor and you'll need to re-drill.
Snap the doorbell unit onto the bracket. Open the app and check your live view. If the camera angle is slightly off — pointing too far to one side or angled awkwardly toward the ground — this is where a wedge kit earns its place. Ring's wedge kit uses three 5-degree angled mounts that can be stacked to adjust your view up to 15 degrees up or down. The Google Nest Doorbell (battery) already includes a corner wedge in the box — no separate purchase needed.
Once the angle looks good in the app, drive the small security/tamper screw into the bottom of the doorbell unit. This is the screw that prevents someone from simply pulling the camera off the bracket — don't skip it.
Set up the app, motion zones, and notifications
Physical installation done — now make the doorbell actually smart. Setup takes 5–10 minutes and this is where the security value kicks in.
Open your brand's app: - Ring: Ring app (iOS or Android) → Set Up a Device → Doorbells - eufy: eufy Security app → Add Device → Doorbell - Google Nest: Google Home app → Add → Set up device → New device
Follow the in-app prompts to connect to Wi-Fi, give the device a location name, and complete the initial firmware update (expect 2–5 minutes on first setup).
After pairing, configure three things immediately: 1. Motion zones — draw the zones around your walkway and porch, and exclude the street to reduce false triggers from passing cars 2. Notification settings — enable doorbell press and motion alerts; decide whether you want real-time clips or just stills 3. Activity zones and sensitivity — tune these now, not after three days of phantom alerts
Ring Battery Doorbell works natively with Alexa, which means pressing your doorbell can announce through any Echo device in your home ("Someone is at the front door") and you can view the live camera feed on an Echo Show. This is worth testing in the Alexa app under Devices → Your Home → Cameras so you know the announcement is working.
Google Nest Doorbell (battery) sends alerts to your phone and to any Google Assistant-enabled speakers or Nest Hub displays when someone presses the button — the behavior is similar to Ring/Alexa but lives entirely in the Google Home ecosystem.
Connect the doorbell to 2.4 GHz Wi-Fi and complete pairing
Ring Battery Doorbell: Requires 2.4 GHz 802.11 b/g/n — do not attempt to connect it to a 5 GHz-only network. If your router broadcasts both bands under a single SSID (common with modern routers and most mesh systems), Ring will find the 2.4 GHz radio automatically. If your 2.4 GHz is disabled or your router only shows 5 GHz, you'll need to enable 2.4 GHz in your router settings before setup.
Google Nest Doorbell (battery): Supports both 2.4 GHz and 5 GHz (802.11a/b/g/n/ac), so it has more flexibility. Still, if your 5 GHz signal at the door is marginal, let the device connect to 2.4 GHz — it's slower but more consistent at range.
Pairing checklist: - [ ] Phone is on the same Wi-Fi network the doorbell will use - [ ] 2.4 GHz band is active on your router (Ring requirement) - [ ] Doorbell battery is charged above 30% - [ ] You're within 10 feet of the mounted doorbell during setup
Adjust motion sensitivity to reduce battery drain
High motion sensitivity is the fastest way to fill your notification feed with extra alerts. Every trigger — whether it's a real visitor, a leaf blowing past, or a car passing 50 feet away — wakes the processor, records a clip, uploads it, and logs the event.
Battery-saving settings to configure immediately: - Set motion sensitivity to medium and tune from there based on real-world results over one week - Limit motion zone coverage to your porch and walkway only — exclude street traffic entirely - Choose a clip length that matches your routine; shorter clips are easier to review and place less load on the battery - Enable "People Only" mode if your doorbell supports it (Ring's Person Detection and Nest's Familiar Face features both reduce false triggers from animals and shadows) - Turn off continuous recording if your model offers it — snapshot-on-motion is dramatically more battery-efficient
Google's Google Home app provides battery optimization settings for the Nest Doorbell (battery), though specific sensitivity numbers vary by firmware version.
Wire-free battery doorbells versus hardwired low-voltage models
These are genuinely different product categories, and the right choice depends on your situation — not just which brand you prefer.
| Feature | Wire-Free Battery | Hardwired low-voltage transformer |
|---|---|---|
| Installation complexity | Low — drill and done | Higher — requires 16–24V AC transformer |
| Existing wiring required | No | Yes (or new wiring run) |
| Ongoing maintenance | Recharge as needed | None — continuously powered |
| Existing chime compatibility | No (battery mode) | Yes (with supported wiring and transformer setup) |
| Best for | No-wiring homes, renters, apartments | Homes with existing doorbell wiring |
| Initial cost | Lower | Often same device, higher install cost |
The key trade-off: battery models free you from wiring constraints, but they introduce a recharge cycle. The Eufy Video Doorbell S330, for example, requires you to remove the doorbell from its mount entirely to charge it via micro USB — a minor inconvenience that some people find annoying after the novelty wears off. Ring's Battery Doorbell Plus uses a quick-release removable battery pack, which is more convenient: you pop the pack out and charge it separately without unmounting the unit.
Hardwired models, once connected to your existing 16–24V AC doorbell transformer, draw continuous power and never need charging. They also preserve your existing indoor chime when the wiring and transformer are compatible.
Watch Out: Some battery doorbells (including the Google Nest Doorbell battery) can be converted to hardwired if you later run wiring — but in battery mode, your existing wired chime will not ring. This surprises people who expected both to work simultaneously.
When a future transformer retrofit makes sense
If you're in a home you own (not renting) and you want to eliminate the charging hassle permanently, a low-voltage transformer retrofit is a legitimate upgrade path — especially if your home already has a doorbell button location with wire stubs that were never connected.
Retrofit makes sense when: - [ ] You've owned the home for at least a year and plan to stay long-term - [ ] You chose a dual-mode device like Google Nest Doorbell (battery), which supports battery or wired power - [ ] You find yourself recharging more than once a month (high-traffic households) - [ ] You want your existing interior chime to ring when someone's at the door - [ ] You're already planning an electrical panel or outlet project — bundle the work to save on labor
A licensed electrician running a low-voltage doorbell wire typically costs $100–$200 for a straightforward run on a single-story home. Given that Angi estimates a full professional smart doorbell install runs $150–$400, it's worth comparing the two scenarios when planning.
Common mistakes that cause bad video, weak alerts, or loose mounts
These are the errors that generate one-star Amazon reviews. Every one of them is avoidable.
1. Skipping the Wi-Fi check before drilling This is the biggest one. Mounting a doorbell at a location with weak signal guarantees dropped clips and alert delays. Run the signal check described above — it takes three minutes.
2. Mounting above 48 inches People instinctively put a doorbell at eye level (around 60–66 inches). At that height, the camera looks steeply downward at visitors' foreheads, not their faces, and misses packages entirely. Stick to 48 inches from the ground.
3. Using the wrong anchors for the wall material Drywall anchors in a stucco wall will eventually pull out under vibration and weather exposure. Match your anchor to your surface — masonry anchors for brick or stucco, standard anchors for wood or vinyl siding.
4. Skipping the level check A doorbell that's 3 degrees off-level is visually obvious every time someone looks at it. The leveling template and torpedo level take 90 seconds to use correctly.
5. Not using a wedge kit when the wall angle demands it If your door frame is at an angle to your main walkway — common on corner-entry homes — mounting flush to the wall points the camera in the wrong direction. Ring's wedge kit adjusts the view in 5-degree increments; use it rather than repositioning the bracket.
6. Ignoring motion zone setup Default motion sensitivity set to maximum will fill your notification feed with alerts triggered by passing cars, squirrels, and wind-blown branches. Configure motion zones immediately after installation.
7. Not charging the battery before mounting Installing the doorbell with a low battery means your first real-world battery-life reading is not useful and you'll be taking it down to charge within a week.
When to call a pro for stucco, pre-stressed concrete, or difficult mounting
When to Call a Pro: - Multi-coat or synthetic stucco (EIFS): Drilling into Exterior Insulation and Finish System (EIFS) stucco without knowing the substrate can punch through insulation board and damage the water-resistant barrier beneath. A contractor familiar with EIFS needs to locate studs or backing and use specialized anchors. - Pre-stressed or post-tensioned concrete: This type of concrete contains tensioning cables or rods under load. Drilling into it without a structural map of cable locations risks cutting a tensioning element — a serious structural safety event. Do not DIY this. Full stop. - Hollow clay tile or heritage masonry: Common in 1920s–1950s homes, hollow-core masonry requires specialized toggle anchors. Drilling without knowing the substrate thickness leads to anchor failure. - Any surface where the drill bit hits unexpected resistance or the hole crumbles: Stop drilling. Unexpected conditions (voids, loose aggregate, delaminated stucco) need professional assessment before anything is anchored to that wall. - Complex rerouting or new wiring for hardwired conversion: If you want to run new low-voltage wire through finished walls, that's an electrician job — not because it's dangerous at low voltage, but because fishing wire through finished walls without damaging drywall or insulation is a skill that takes experience.
For standard brick, standard stucco over concrete block, wood siding, or vinyl siding, a careful DIYer with the right masonry bit handles this without issue. The line is crossed when the substrate is unknown, structurally load-bearing, or historically significant.
Battery replacement, recharging, and long-term maintenance
Battery-powered doorbells need periodic attention — the recharge cadence varies by model, traffic volume, motion sensitivity settings, temperature, and Wi-Fi signal quality, so plan for occasional charging rather than a set schedule.
What the recharge process looks like by brand:
- eufy (e.g., Video Doorbell S330): Remove the doorbell from its mount, connect via micro USB, charge until full, reinstall. Consumer Reports notes this is the standard workflow for eufy's battery models.
- Ring Battery Doorbell Plus: The quick-release rechargeable battery pack pops out of the doorbell body without removing the whole unit from the wall. Connect the pack to the included micro USB cable and charge separately. Much more convenient for high-frequency rechargers.
- Google Nest Doorbell (battery): Charges via the included USB-C to USB-A cable; requires removing the unit from the wall plate.
Maintenance checklist — do this every 6 months:
- [ ] Clean the camera lens with a soft, dry microfiber cloth — dust and spider webs reduce image clarity more than most people expect
- [ ] Check that the mounting bracket screws are still snug — thermal expansion and contraction can loosen them over time in climates with cold winters
- [ ] Verify your Wi-Fi signal hasn't degraded (router replacement or mesh node changes can affect signal)
- [ ] Update firmware — check the app for pending updates; most install automatically, but confirm
- [ ] Test the motion zones — landscaping grows, cars park differently, and your original zones may need adjustment
- [ ] Check battery health percentage in the app and recharge if below the level your household needs
Pro Tip: Cold weather can reduce lithium battery capacity, so if you live in a colder climate and notice the battery dropping faster during the winter, that can be normal rather than a defect.
Can you install a Ring, eufy, or Nest doorbell without existing wiring?
All three brands have fully wireless battery models designed specifically for no-wiring installations — and all three work well. Here's how they differ in practice:
Ring Battery Doorbell Ring's entry-level battery doorbell requires 2.4 GHz Wi-Fi (802.11 b/g/n) and a minimum 2 Mbps upload speed. It works natively with Alexa — the dominant US smart home voice platform — and integrates with Ring Protect subscription plans for cloud storage and motion history. No wiring needed. The quick-release battery on the Battery Doorbell Plus model is a practical upgrade over the base model if you anticipate frequent recharging.
eufy Security Video Doorbell eufy is the local-storage option. Most eufy battery doorbells include local storage via a HomeBase hub, which means your footage doesn't require a monthly plan. eufy's guide recommends battery operation and the 48-inch mounting height explicitly. The trade-off: eufy's ecosystem is less integrated with Alexa and Google than Ring or Nest.
Google Nest Doorbell (battery) Nest is the strongest pick for Google Home households and anyone who wants 5 GHz Wi-Fi flexibility (the only one of these three that supports both bands). It includes a corner wedge in the box and can be converted to wired power later if you add low-voltage wiring. Battery installation does mean your existing wired interior chime won't ring — Google Assistant-enabled speakers replace that function in the Google ecosystem. Nest Aware subscription required for extended event history beyond the free 3-hour snapshot history.
Cost Snapshot: Battery video doorbells range from roughly $80 (eufy entry-level) to $250 (Ring Battery Doorbell Plus, Nest Doorbell battery). Professional installation costs $143–$398 per Angi — DIY install puts that savings directly in your pocket.
Video doorbell installation FAQ
Can you install a video doorbell without existing wiring?
Yes. Battery-powered video doorbells from Ring, eufy, and Google Nest are designed specifically for this scenario. You need a power drill, appropriate wall anchors for your surface, a Wi-Fi connection with adequate signal strength at the door, and about 30–60 minutes. As eufy's installation guide states directly, "a battery-operated doorbell camera is an excellent option" when no wiring exists.
Do wireless video doorbells need Wi-Fi to work?
Yes — a Wi-Fi connection is required. Without it, the doorbell can't send motion alerts, stream video to your phone, or connect to smart home platforms like Alexa or Google Assistant. Ring Battery Doorbell requires 2.4 GHz Wi-Fi and a minimum upload speed of 2 Mbps. Google Nest Doorbell (battery) supports both 2.4 GHz and 5 GHz. Always verify signal strength at your mounting location before drilling.
How high should a video doorbell be mounted?
Mount it at 48 inches from the ground, per eufy's installation guidance. That height captures adult faces at a usable angle while still showing packages left at the door. Mounting higher (at eye level, around 60–66 inches) causes the camera to look down too steeply for clear face identification.
What is the difference between wired and battery-powered video doorbells?
Wired doorbells connect to your home's existing 16–24V AC doorbell transformer, drawing continuous power and preserving your existing indoor chime. Battery-powered doorbells require no wiring and are easier to install, but need periodic recharging and typically do not activate your existing wired chime. Some hybrid models — like the Google Nest Doorbell — can operate in either mode, but battery installation means the wired chime will not ring.
Do you have to drill to install a video doorbell?
For a secure, permanent mount on wood, brick, stucco, or siding, yes — drilling and anchoring the bracket is required and strongly recommended for any security device. No-drill adhesive mounts exist as third-party accessories, but most manufacturers don't endorse them for permanent doorbell installation because adhesive strength degrades with weather exposure, and a doorbell that falls off the wall is a security liability. If you cannot drill (rental restrictions), check with your landlord first or consider an apartment-friendly intercom alternative.
Sources & References
- eufy Security — How to Install a Doorbell Camera Without an Existing Doorbell
- Ring — Battery Doorbell Product Page
- Ring Support — Installing Battery-Powered Doorbells
- Ring Support — Using a Wedge or Corner Kit
- Google Nest Doorbell (battery) — Specs
- Google Nest Doorbell (battery) — Setup Guide
- Angi — Doorbell Installation Cost
- Angi — Smart Video Doorbell Installation Cost
- Consumer Reports — Best Video Doorbell Cameras Without a Subscription
Keywords: Ring Video Doorbell, eufy Security Video Doorbell, Google Nest Doorbell, 2.4 GHz Wi-Fi, RSSI -65 dBm, Wi-Fi analyzer app, masonry anchors, stucco siding, brick veneer, pre-stressed concrete, leveling template, UL Listed, Alexa, battery-powered doorbell, hardwired low-voltage transformer